
Presentations play a central role at conferences and in business in general. There are hundreds of thousands of presentations made every day, and in the world of conferences and meetings, more than 90% are based on PowerPoint slides. Even though Office 365 introduced continuous updates and bug fixes to PowerPoint over a decade ago, there are still many technical problems that occur when people give their presentations.
In this blog post we’ll present five types of common presentation problems and our recommended solutions for dealing with them. We believe these five problem types cover 99% of all the presentation-related technical problems that you see at conferences and live events today.
Use these links to quickly jump to your particular problem:
- The video does not play at all.
- The formatting does not look right.
- The video doesn’t play back correctly.
- The video plays back correctly, but there’s no sound.
- The slides appear to have shrunken.
If none of these fit your particular case, please contact us. We’re curious to hear your experience and to see if we can help you out.
Problem 1: The video does not play at all
Of the common presentation problems that we at Preseria have observed at conferences, by far the most frequent issue is PowerPoint videos that won’t start playing. There are four main reasons why this might happen:
- A broken link to an external video file.
- The source of the online video is gone.
- Codec unavailable / Compatibility issue.
- The video is set to start “On Click” instead of “In Click Sequence” or “Automatically”.
- A cluttered TEMP folder.
Case 1: A broken link to an external video file
If you’ve inserted a video into a slide without embedding it, PowerPoint will create a link to the absolute path of the video on your hard drive. This feature allows you to create light-weight PowerPoints that don’t take up much storage, and is ideal if you have lots of PowerPoints referencing the same large-sized video, but will cause a problem when you try to play your PowerPoint on another computer.
Recommended solution: Remove the link and embed the file
If you have access to the source file, you should remove the link and embedded it instead. You can do that by following these steps:
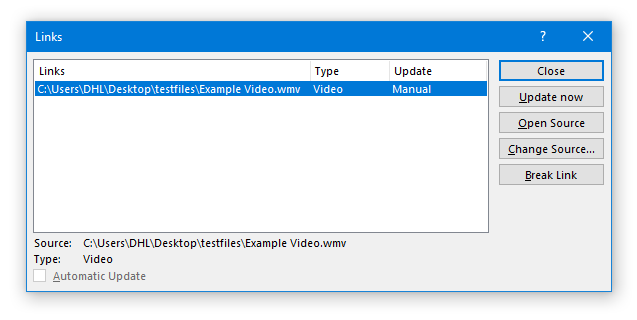
- Open the PowerPoint file and click “File” in the top menu bar. This will bring up the main menu.
- In the lower right corner, under “Related Documents”, click “Edit Links to Files”.
- Click “Break Link”. The video will still appear on the slide, but it will be embedded in the presentation instead of linked.
- Save your changes. You’ll notice that the file size has increased now that the video is embedded into the PowerPoint file.
Source: Microsoft support article
Alternative solution: Copy the video to the same folder as the PowerPoint
If PowerPoint can’t find the file at the absolute path, it will look inside the containing folder of the PowerPoint file and see if it can find a file with the same filename there. If it does, it will load and play it instead.
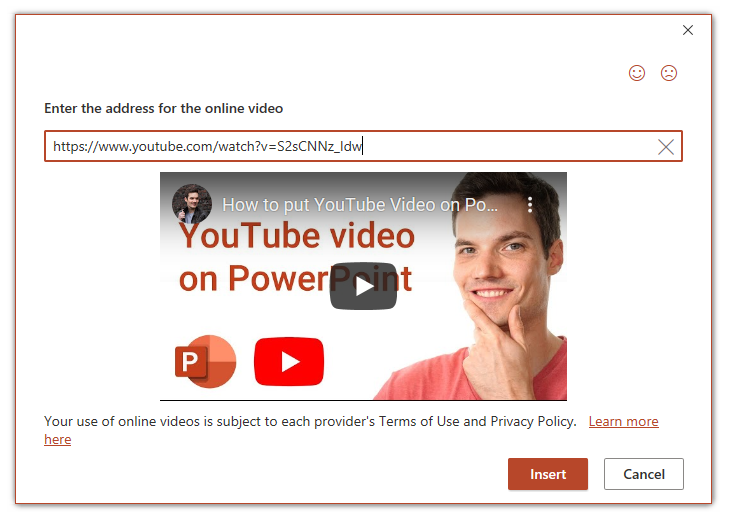
Case 2: The source of the online video is gone
In general, I’d recommend avoiding using PowerPoint’s “Insert online video” feature if you can. You are dependent on a working Internet connection to play the video and you risk it being suddenly removed or taken down. Even if you are online, you might have to wait a few seconds for the video to load before it starts playing.
Recommended solution: Download the video and embed it instead.
This is not really a solution to an online video disappearing, but more of a prevention technique. If you own the online video (it’s published by you), but have lost the source file, you can try to grab the source file from the streaming service by using youtube-dl. I won’t go into steps on how to install and use this software, but you should be able to follow the installation instructions for your system. Keep in mind that if you don’t own the video, but still decide to download and embed it in your presentation, you are probably infringing on someone’s copyright.
Case 3: Codec unavailable / Compatibility issue
If you’ve ever had to deal with multimedia-rich PowerPoint presentations that were created with an old version of Office, or created on a Mac, but played back on a Windows machine (or the other way around), you’ve probably seen the “Codec unavailable”, “Media unavailable” or “Cannot play media” error message. This error basically says that PowerPoint recognizes that there’s a video clip on a particular slide, but it doesn’t have the necessary third-party software installed on your machine to play it.
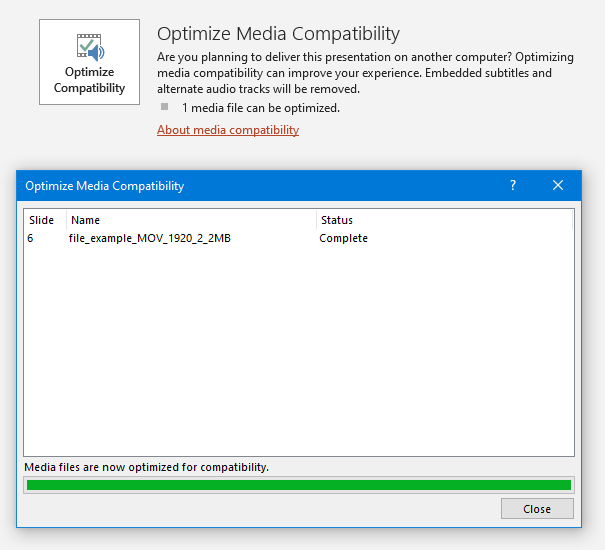
Recommended solution: Optimize Media Compatibility
PowerPoints built in “Optimize Media Compatibility” feature can often fix videos that won’t play. Follow these steps and then check that the video plays without issues.
- Open the PowerPoint file and click “File” in the top menu bar. This will bring up the main menu.
- Go to “Info” and click “Optimize Media Compatibility”
- Wait for the media file to be optimized, go into slideshow mode and test to see if the optimization helped.
If you encounter notable loss in audio or video quality, stuttering or visual artifacts that aren’t supposed to be there, you can try the alternate solution below.
Alternative solution: Convert to MP4
If optimizing media compatibility didn’t work, or the quality of the optimized video was bad, you can try to convert the video to another format manually. Our favorite tool for this task is a free and open-source tool called HandBrake. Instructions on how to convert nearly any format to MP4 (H.264 video and AAC audio), a format that PowerPoint supports on all platforms, are found at the bottom of this post.
Case 4: The video is set to start “On Click” instead of “In Click Sequence” or “Automatically”
This setting is not a problem or error in itself, but the “On Click” label is misleading and often misunderstood by presenters. When inserting videos into a slide in PowerPoint, you will have the options to set it to start “Automatically”, “In Click Sequence” or “On Click” / “When Clicked On”. In later versions of Office, Microsoft identified the ambiguous label “On Click” (which could be interpreted as a mouse click or a next click on a “clicker”) and changed it to “When Clicked On”. This clarification is a big improvement, but we still see presenters accidentally jumping over their video and onto their next slide, when their real intention was to start the current slide’s video.
Recommended solution: Change the video to start “Automatically” or “In Click Sequence”
Because presenters at conferences and events, in most cases, only have access to a presentation remote, a so-called “clicker” with “Next” and “Previous” buttons, we recommend starting videos “Automatically” or “In Click Sequence”. The setting “On Click” / “When Clicked On” requires the presenter to move over to the laptop, move the mouse cursor over the video and click the left mouse button to play the video. Not very seamless and easy to forget when you’re presenting in front of a live audience. The only case we see where “On Click” / “When Clicked On” is useful is if you absolutely need to present multiple videos, repeatedly, on a single slide in a non-linear fashion.
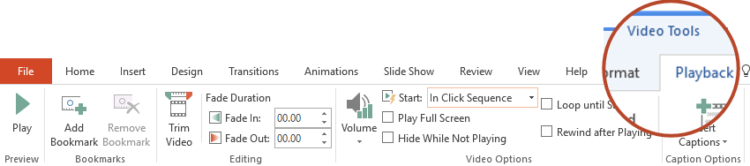
To change the way a video starts, follow these steps:
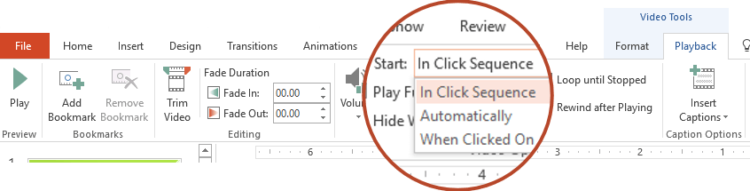
- Open your PowerPoint and navigate to the slide where you have your video.
- Click on it to select it, then click the “Playback” tab in the top menu.
- Click the drop-down menu next to the “Start:” label and change from “On Click” / “When Clicked On” to “Automatically” or “In Click Sequence”, depending on whether you want to have your video start immediately when the slide is displayed, or after a number of “next”-clicks (for example, after a set of animation steps).
- Optionally tick the “Play Full Screen” checkbox if that’s what you want.
Source: Microsoft Support Article
Case 5: Cluttered TEMP folder (or low disk space)
I honestly haven’t experienced that having a cluttered “TEMP” folder with lots of files will affect PowerPoint in any negative way, but several forums and blogs mentions it being a possible reason for why videos in PowerPoint won’t start. I believe lots of files in a TEMP folder could potentially fill up your hard drive and cause the computer to slow down because of low disk space. That could certainly have an impact on PowerPoint’s ability to load and play a file. Regardless, if nothing else works, it’s worth a try to perform a cleanup of the TEMP folder.
Recommended solution: Run a Disk Clean-up for your System Disk
Follow these steps to perform a disk clean up of your system disk (where Windows and Office are installed)
- First, close all running programs.
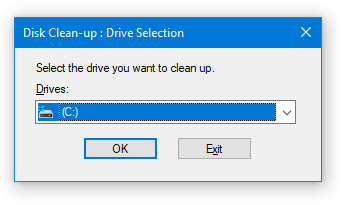
- Then Click Start and type “Disk”
- “Disk Clean-Up” should appear as the “best match” and suggested app to run.
- Click “Disc Clean-Up” or press “Enter” to run it.
- Select the drive with the blue Windows icon next to it (usually C:) and press “OK”
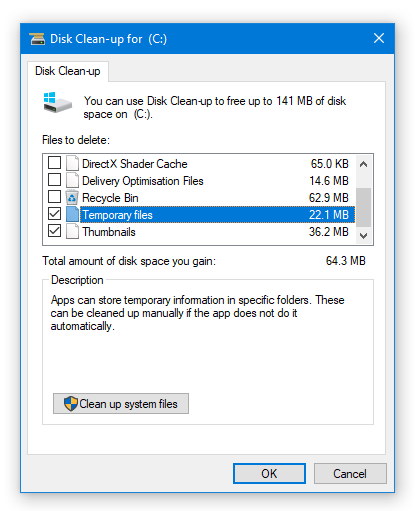
- Make sure “Temporary Files” are checked, and optionally clean up some other stuff while you’re at it.
- Click “OK” and let the cleanup process finish.
- Restart your computer, log back in, launch PowerPoint and see if the video starts.
Problem 2: Formatting does not look right
Another common problem that we often see are slides with text overlapping, line breaks missing and text boxes appearing beyond the margins of the slide, making them partly invisible when presented in slideshow mode. This is most likely a font issue, something that is not uncommon when people present on a different computer than where they created the slides. In rare cases, the formatting issues are caused by something else, like an out of date Office installation or a specific configuration on the presentation computer.
Case 1: Missing fonts on presentation computer
Not all fonts are created equal. Some safe fonts will always work, no matter what version of Office you are running or whether you’re on a Mac or Windows computer. Others, not so much. Custom fonts (fonts that do not come with Office or the OS) have to be embedded into the PowerPoint or installed on the presentation computer.
Recommended Solution: Embed the missing fonts
Unfortunately, not all fonts will let you embed their characters into a PowerPoint. There are different levels of “embeddability” that allows for different levels of viewing, printing and modification of the custom font text. If your font allows it to be shared for printing/viewing or editing, you should be able to embed into a PowerPoint, copy that file to another computer and have the fonts show up correctly. To embed custom fonts into a PowerPoint, follow these steps:
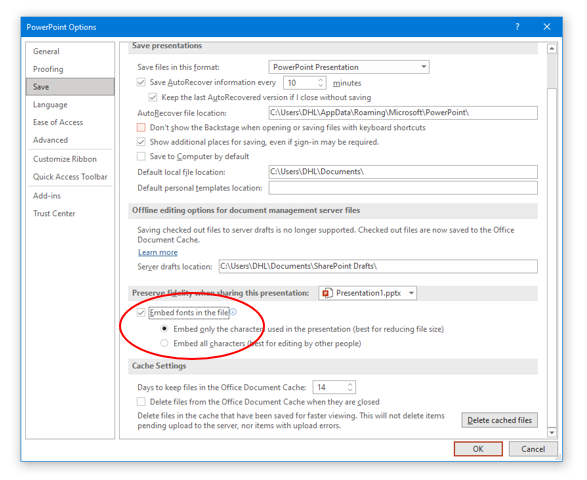
- Open the PowerPoint file and click “File” in the top menu bar. This will bring up the main menu.
- Click “Options” at the bottom.
- In the dialog box that appears, select “Save”, then put a check next to “Embed fonts in the file”
Source: Microsoft Support Article
Alternative Solution #1: Install the font manually
If you have a license for the font, but it can’t be embedded into PowerPoint, you can install the font on the presentation computer. Be careful though, you can’t just share a font file along with your presentation unless the EULA (End User License Agreement) of the font explicitly allows this. Installing a font on Windows is as easy as right-clicking the font file and clicking “Install”. After it’s installed, PowerPoint should display the text correctly (you might need to restart PowerPoint).
Alternative Solution #2: Replace font and adapt each slide to the new font
You may find yourself in the unfortunate situation of having to replace the font. If so, try to find a font that is similar to avoid too much manual fixing of each slide. Microsoft Support has a step-by-step instruction on how you can replace fonts throughout your presentation or on a single slide. Unfortunately, the built-in feature for replacing fonts doesn’t always work for all fonts in your presentation. Slide design company BrightCarbon has good explanation for why this might happen and a guide on how you can replace pesky fonts that can’t be replaced using the standard method.
Case 2: Something else than missing fonts is causing it
Sometimes the text will look weird even though all the fonts are available and installed on the presentation computer. Here are some general steps you can take that might help in such cases:
- Make sure your Office installation is updated. Open PowerPoint and go to “File” → “Account” → “Update options” → “Update Now” to check it.
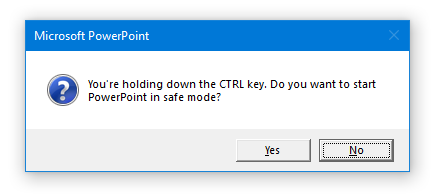
- Try to open the PowerPoint in “Office Safe Mode” by pressing and holding the “Ctrl” key before double-clicking on the PowerPoint file to open it.
- Make sure “Disable hardware graphics acceleration” isn’t turned. Open PowerPoint and go to “File” → “Options” → “Advanced”, then scroll down to the Display section and make sure the box is unchecked.
 Finally, reopen the file to see if any of those things helped.
Problem 3: The video doesn’t play back correctly
Your presentation’s videos might play perfectly on your own computer, but when you load it up on the presentation computer at the location where you are giving your talk, you might experience issues during playback. Common issues are:
- Video plays, but only with sound — no image (black screen/rectangle where the video is supposed to be).
- Video lags behind audio or vice versa.
- Video or audio glitches and image tearing.
- Other video performance issues, similar to the ones above.
On rare occasions, the presentation computer is not powerful enough for your slides. It could be low on memory or have its CPU overloaded by other running tasks and applications. Obsolete hardware or misconfigured presentation computers are rarely the case. What’s more common is slight differences in how different operating systems (Mac vs. Windows) and different versions of PowerPoint decode video. Regardless of what’s causing the problem, following one of the two solutions below should resolve it:
Recommended solution: Optimize Media Compatibility
The steps for Optimizing Media Compatibility can be found above, under “Problem 1”, in the section about “Codec unavailable / Compatibility issue”
Alternative solution: Convert using Handbrake
See “Converting a video clip using Handbrake” at the bottom of this article.
Problem 4: Audio playback issues
Sometimes everything works fine when testing the PowerPoint beforehand, but when you’re at the conference and live, on stage, Murphy’s law kicks in and the audio of your PowerPoint video clip cannot be heard. When dealing with lots of cables, sound mixers and speakers, there’s always the chance that there’s something faulty with the hardware, or that it’s been badly configured. But, in my experience, most technicians at conferences know their stuff and prevent such things from happening. What’s more common is actually that the sound of video clips are muted or turned all the way down by a mistake. It could be that the presenter had their system volume at max and, when practicing their talk, turned down the volume of their videos to 5%, without turning it back up before saving and submitting their presentation file.
Recommended Solution: Check the audio level, then convert if that doesn’t help
First, we recommend that you check the volume setting of the video in PowerPoint. If it’s muted or turned almost all the way down, just turn it back up to 100% again. If that doesn’t help, we suggest you try to convert the video clip to MP4 with AAC audio by following the steps in the addendum below on how to convert a PowerPoint video using HandBrake.
Problem 5: Slide format mismatch
Most projectors and big screen TVs today are using the Widescreen 16:9 format. If you’re presenting at a conference, it’s almost guaranteed that your slides will have the best fit on the big screen if they are in 16:9 format. If you have an old PowerPoint slide deck that you’ve gradually updated with new information, but kept the same style and layout since you first created it in 1905, it’s a good chance it’s in 4:3 and that you’ll see black vertical borders to the left and right of your slides when presenting it on a 16:9 screen. When presenting 4:3 slides on a 16:9 screen, your slides will be shrunken down to fit and text can become hard to read. Therefore we recommend you to always start a new presentation using the (default) Widescreen format, and convert your old slide decks to 16:9.
Recommended Solution: Convert slide decks to Widescreen (16:9)
To convert your PowerPoints to use 16:9 format, follow these steps:
- Open the PowerPoint presentation.
- Click on the “Design” tab in the top menu and then click on “Slide Size” in the “Customize” group, near the far right end of the toolbar.
- Select Widescreen (16:9)
- In the dialog box that appears, try “Maximise” first. If your slide content looks weird or doesn’t fit the slide, try again with “Ensure Fit” and manually resize text boxes and images to fit the new format.
Tip: When manually resizing images and shapes, hold down the left SHIFT key to lock the aspect ratio.
Source: Microsoft Support Article
Addendum: Extracting a video from PowerPoint and converting it using HandBrake
Before you install and run HandBrake you need to make sure that you have the video file that you want to convert. You can’t just load your PowerPoint into HandBrake and expect it to fix your video. First you need to extract the embedded video from it, then convert it to MP4 and finally re-insert the converted video into the correct slide and position. If you already have a copy of the video file, and not just the PowerPoint, you can skip this step.
How to Extract a video from PowerPoint
- Open your PowerPoint file and navigate to the slide where you have your troublesome video.
- Right-click on the video and select “Save Media As”.
- Choose a path, for example, your “Desktop”, and save the file. It will often be called “Media1.mp4” or similar if you’ve optimized the media file in PowerPoint earlier.
Once you’ve located your video file, you can open HandBrake and continue with the manual conversion.
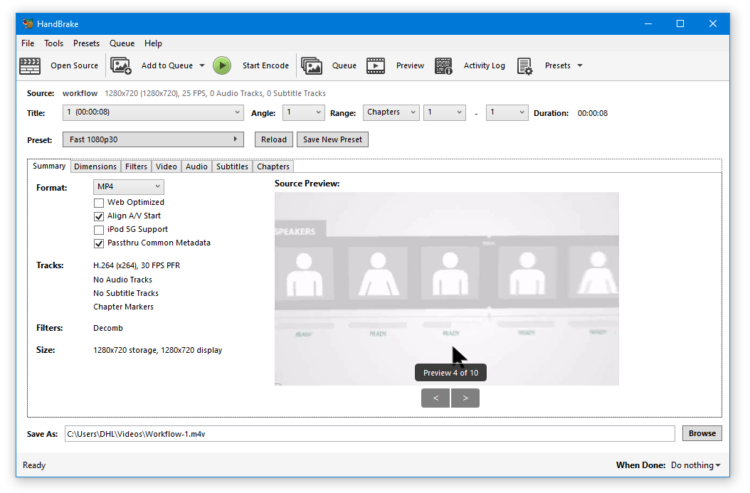
How to convert a video into a format that PowerPoint accepts using HandBrake
- Download and install HandBrake.
- Open your video file by dragging and dropping into the gray area or clicking the “File” button.
- After opening the file you’ll be presented with a lot of options. Don’t worry, the default preset (“Fast 1080p30”) is often good enough, but depending on the quality of your source video you might want to tweak the settings so that the converted video isn’t visually or audibly worse than the original. We recommend you first try the default preset and do a test run by clicking “Start Encode”.
- The resulting file will have an .m4v file extension. If you want to, you can save it as .mp4 (it doesn’t matter). Open your PowerPoint file and navigate to the slide with the video.
- Make a note of the approximate coordinate of where the original video is placed on the slide (maybe take a screenshot?), click it and note down the selected options in the Playback tab (“Start on”, etc.) so that you can replicate it when inserting your converted video.
- Now remove your original video and insert your converted version, embedding it into the PowerPoint. Adjust the placement and playback options to match the original.
- Test run your PowerPoint in slide show mode and verify that it runs. Also check that the audio and video quality isn’t notably worse than the original. If so, try to convert again using the “Production Standard” preset in HandBrake. It might create a file that takes up more space than the original, but now there should not be any loss in audio or video quality.
Summary
To prevent common presentation problems and avoid having to fix your presentation in the first place, you should follow these points:
- Embed any new media and break existing links to external files.
- Optimize all media for compatibility.
- Avoid using non-standard fonts or make sure they are embedded.
- Avoid using setting videos to start “On Click”.
- Use Widescreen (16:9) slide size.
Additionally, we recommend all presenters to read and follow the presenter guidelines of the particular event you’re presenting at. You’ll likely find useful information on slide design, slide templates to use and what technical equipment is available in the room where you’re presenting. We can’t really emphasize enough how important it is follow the best practices regarding audio and video in PowerPoint and check your presentation for common issues, especially if you are not presenting from your own computer.